STEMI Room F-655
The
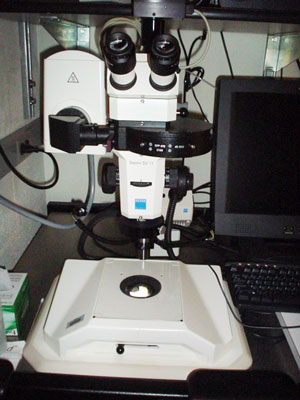
STEMI is a stereo dissection microscope used for applications ranging from macro to micro
imaging in transmitted, darkfield or epifluorescent modes. For examples of the fluorescent
images collected on the scope click
here. For other example images click
here.
Table of Contents:
Turn on the system:
- SIGN
INTO THE LOGBOOK!!
- If
you want to look at fluorescence, turn on the mercury lamp located on the shelf to the
left. Make sure that the lamp and safety lights are steady green before proceeding.
- Turn
on the computer and the monitor if they aren’t already on. To do this, turn on power
strip #1, and then turn on the computer and the monitor.
- For
color imaging, turn on the CRI filter located on the shelf.
- Turn
on the digital camera by rocking the power switch to the left (1394PWR). The light will be
green.
- Log
into the computer using the User account.
- Start IPLab.
- *Be
sure that each time you change the magnification you take a picture of a standard size,
such as a the ruler or scale slide that we have provided. *click here and see
what will happen when you try to make a figure for publication if you don't follow these
instructions.
Light sources:
There are two different light sources with power supplies labeled top
and bottom.
- The bottom light source is for transmitted light. Transmitted light means
that the sample is illuminated from underneath and the light goes through the
sample.
- The top light source will reflect light off of the sample.
- You may use both the top and bottom light sources simultaneously for more
complex lighting.
- Initially set brightness at ~3.5, afterwards you may adjust the
brightness as needed.
Bottom Light source:
The bottom light source has four
settings which will vary illumination of the background. You
can adjust it by moving the slider beneath the stage. The following conditions exist when the slider is:
- Left and pushed in -moderately bright (diffusion filter)
- Left and pulled out -darkest
- Right and pushed in -brightest
- Right and pulled out -similar to dark field
Top Light source:
If your sample is thick or you'd
prefer to illuminate from above, turn on the TOP light source. There are two choices for
the source of light, of which only one may be used at a time. They are:
-Point lights for smaller samples
-Ring light for larger samples
The
Top light source should be set the light in the blue region [You must depress and rotate
the knob to get to the blue region].
Changing the top light source:
- Turn off light source.
- Unscrew ring connecting fiber optic cable to source.
- Gently remove fiber optic of unwanted source (ring or point source).
- Replace with desired optic.
- 5. Reverse steps.
Focusing
in Brightfield:
- Make sure the fluorescence turret is set to 4 (NO FILTER).
- Make sure the CRI filter is pushed in.
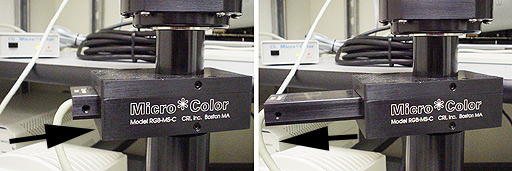 |
| Slider should be pushed in for RGB color
imaging such as brightfield histology. |
Slider should be pulled out for fluorescence
or b/w imaging. |
- Place sample on the stage. Note:
Please be careful not to scratch the glass surface.
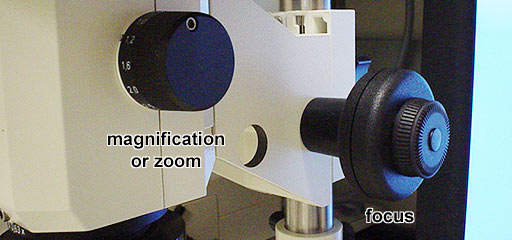
- Set the magnification using the knob on the right side of the microscope
to the highest zoom, 6.6.
- Focus the sample using coarse (large-"inner") and fine
(small-"outer") knobs.
- Focus the right eyepiece on the crosshairs by rotating the rubberized
rim, and re-focus your sample with that eyepiece.
Next, focus the left eyepiece so that the image is sharp.
- The dial below the eyepieces adjusts the depth of focus. We recommend you leave it set to the middle
position.
- You may adjust the zoom.
Brightfield Imaging:
- For color imaging, make sure CRI filter is inserted.
|
| Slider should be pushed in for RGB
color imaging such as brightfield histology. |
Slider should be pulled out for fluorescence
or b/w imaging. |
- Send light to the camera by pushing beam splitter in.
 |
| Slider pulled out to see with both eyes
through the occulars. |
Slider pushed in to send light to camera. |
- To preview the image in B/W, press F3. For color
preview, press F7 and change binning to 2x2.
- Focus on screen.
- Place the cursor on the brightest spot on the image, you
can find the pixel intensity value at the bottom left. Adjust exposure time so that the
maximum value of the brightest spot is about 200.
- Press <SHIFT>F8 to capture an image.
- For 2x2 binning, enter the exposure time from the previous step.
- For 1x1 binning, multiply the exposure estimated by 4.
- Press F8 to take a picture.
- File --> Save All Files and put the pictures in a
folder with the experiment name or, for each picture, File --> Save As.
Make sure all files are saved as TIFF.
Focus in Fluorescence:
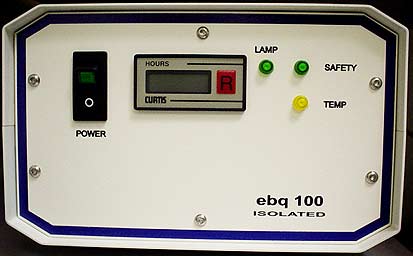
|
Turn the mercury lamp power supply on
1. Only if you are using fluorescence and
2. If you really need it, turn on it FIRST before the other
equipment. The camera must be off when you turn this lamp on!! |
- Turn fluorescent turret to the appropriate filter:
- 1 – GFP (ex. 488 em. 510)
- 2 – BFP is the new standard; you may swap out this
filter for CYAN (ex. 435 em. 470)
- 3 – RFP (dsRED) (ex. 560 em. 590)
- 4 – no filter (for brightfield only)
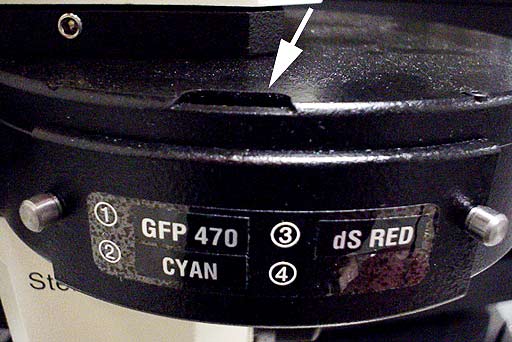 |
| The arrow points to a small window where you
can read the position of the filter turret. |
- Pull out the CRI filter from the light path one stop
(for B&W imaging).
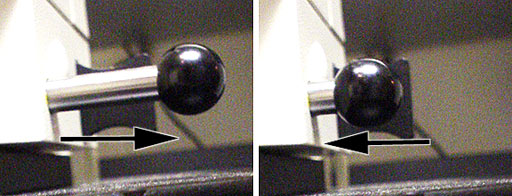
- Open fluorescence shutter by pushing in the slider one stop for no
filter, or two stops for Neutral Density filter.
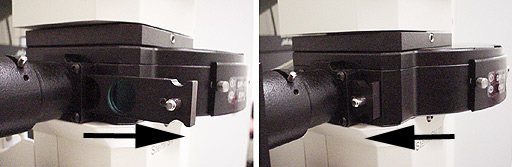 |
| Turn off fluorescence by pulling
slider out. |
Push slider in to open fluorescent shutter. |
Fluorescence Imaging:
- Use the F3 key to run a live focus (<SHIFT>F10
may be used to preset the box size and exposure time).
- On the live focus window, find what you want to image and focus the
image.
- Place the cursor on the brightest spot on the image, you
can find the pixel intensity value at the bottom left. Adjust exposure time so that the
maximum value of the brightest spot is about 200.
- Use the <SHIFT>F11 command to set the exposure
times and binning for the QuickSnap function keys F9, F10, F11 and F12.
- For 2x2 binning, enter the exposure time from the previous step.
- For 1x1 binning, multiply the estimated exposure time by 4.
- Then press F9, F10, F11 or F12 to snap
a picture. We do not recommend usig the snapshot button in the camera menu!
- Bring the live focus window to the front and continue imaging.
- File --> Save All Files and put the pictures in a
folder with the experiment name or, for each picture, File --> Save As.
Make sure all files are saved as TIFF.
| Function key definitions
All exposure times are in milliseconds. For the unitly challenged: 1000ms =
1s.
| F1 |
|
| F2 |
|
| F3 |
Focus on screen:
Click on the Acquire Preview control window to change time, size, etc. while focusing.
Click on the image window to use other function keys while focusing. |
| F4 |
|
| F5 |
|
| F6 |
|
| F7 |
Color Capture with preview-interactive |
| F8 |
Color Capture without preview |
| F9 |
Quick Snap 1 -- Takes a picture immediately using the exposure
parameters set using <SHIFT>F11
Names picture "red"
Use <SHIFT>F11 to set the exposure time and image size |
| F10 |
Quick Snap 2 -- Takes a picture immediately using the exposure
parameters set using <SHIFT>F11
Names picture "green"
Use <SHIFT>F11 to set the exposure time and image size |
| F11 |
Quick Snap 3 -- Takes a picture immediately using the exposure
parameters set using <SHIFT>F11
Names picture "blue"
Use <SHIFT>F11 to set the exposure time and image size |
| F12 |
Quick Snap 4 -- Takes a picture immediately using the exposure
parameters set using <SHIFT>F11
names picture "trans"
Use <SHIFT>F11 to set the exposure time and image size |
| <SHIFT>F1 |
|
| <SHIFT>F2 |
|
| <SHIFT>F3 |
|
| <SHIFT>F4 |
|
| <SHIFT>F5 |
Dispose All Open Windows |
| <SHIFT>F6 |
|
| <SHIFT>F7 |
|
| <SHIFT>F8 |
Sets Exposure Time and Binning for F8 |
| <SHIFT>F9 |
|
| <SHIFT>F10 |
Set Focus Exposure Time and Binning for F3 |
| <SHIFT>F11 |
Set Exposure Time (ms) and binning for Quick Snap commands F9 through
F12 |
| <SHIFT>F12 |
reinitialize to default values |
| <CONTROL>U |
Status Window for information about image |
| <CONTROL>K |
Dispose front window |
| <CONTROL>T |
Convert image to 8 bits with contrast as displayed on screen |
| <CONTROL>A |
Select All |
| <CONTROL>C |
Copy |
| <CONTROL>N |
New Image |
| <CONTROL>V |
Paste |
|
Shutdown
Procedure:
This is a checklist; please follow it step by step.
- Remove your files from the computer. There are two ways to do this:
1. USB flash memory key.
2. Burn a CD.
- Quit IPLab.
- Log out of your computer account.
- If the next user is not present, turn off the camera unit.
- Turn off the light source and power strip at the left.
- Check the signup sheet in the hallway.
**If no one signed up within one hour, you may turn off the
Mercury Lamp, otherwise leave it ON.**
- Remove your sample and clean the glass stage with 95% alcohol and
lens paper only
- Please dispose of waste
appropriately and remember to take your sample with you.
- Sign out of the logbook.
Programming technical notes
by Rosana Leonard and Yan
Deng 04/06