|
Zeiss Axioskop II
The AIF's "routine" light microscope.
(Installed 8/24/04)AxioCam installed July 11th 2005
Featuring: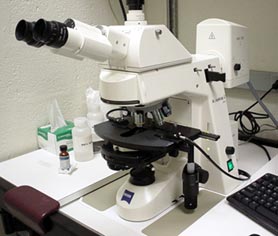
| Phase Contrast | Darkfield |
| Brightfield | DIC/Nomarski |
| Fluorescent filters for Dapi, FITC, Rhodamine | |
| Default Objectives: | Available upon request: |
| 2.5x objective | 1.25x objective |
| 10x | 5x objective |
| 25x Oil Lens | 20x air objective |
| 40x Oil Lens | 63x oil objective |
| 100x Oil Lens |
Table of Contents:
1. Instructions
1.1. Turning on the Microscope
1.2. Microscope configuration
1.3. Using the Microscope
1.4. Using the Axiovision Software and AxioCam
1.5. Shutdown
1.6. Addendum
1.7. Using DIC
1.8. Using Fluorescence
Link. Spatial Scales (a.k.a. Scalebars)
1. Instructions:
1.1. Turning on the Microscope:
1. SIGN INTO LOGBOOK.
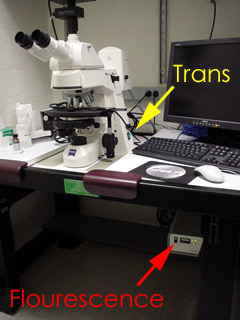
2. Turn on the Mercury Arc Lamp (under the microscope table). THIS MUST BE TURNED ON FIRST.
3. Turn on the transmitted light halogen lamp.
4. Turn on the computer.
5. Select the correct objective for your application.
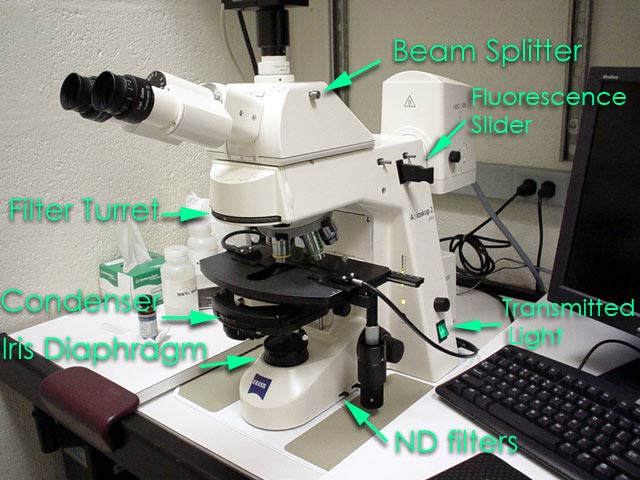
1.2. Microscope configuration:
1. The fluorescence filter turret has several positions that may be used for different imaging applications.
- Brighfield - no filters are in the light path
- DAPI
- FITC
- Texas-Red
- DIC analyzer
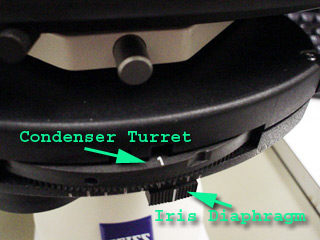
2. The condenser turret has multiple positions which may be used:
- “1” for Phase 1(10x)
- “D”Darkfield
- “I” for DIC (10x and less)
- “I/H” for Brightfield
- “2” for Phase 2 (20x, 25x)
- “II” for DIC (40x)
- “3” For Phase 3 (63x, 100x)
- “III” For DIC (63x, 100x)
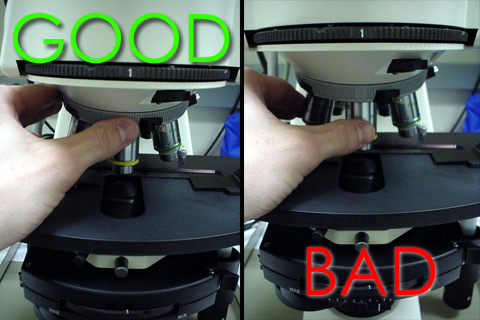
3. Be sure not to close the Iris Diaphragm too much, it is a common mistake made by many people. If the Iris is closed too much the resulting images will have greatly reduced resolution.
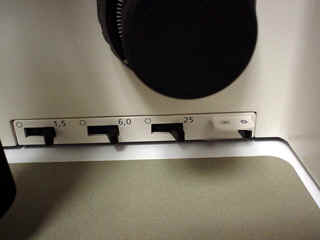
4. The neutral density filters are on the right side of the microscope and settings include(from front to rear):
- “1.5% ND” (reduces light by 1.5%)
- “6 % ND”
- “25% ND"
- Diffusion Filter -Should ALWAYS stay in the light path.
5. The transmitted light may be adjusted several ways. The 3200 K setting is bright and should be used to collect a color correct image. Simply, the sample isn't yellowed as it could be with a lower light setting.
![]()
1. Place the slide on the stage and use oil if the objective is an oil immersion lens only!
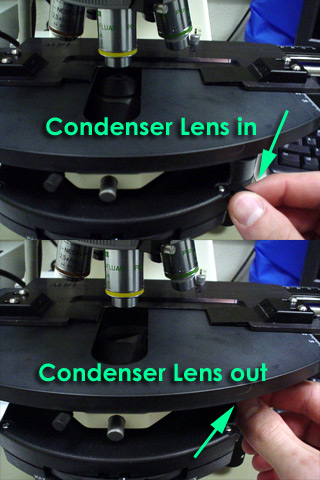
2. The condenser lens must be in the light path when using objectives greater than 5x.
3. Focus on your sample.
4. When the sample is in focus align the scope for Koehler illumination, the simple 4 step process described here.
5. You are now ready to image using the digital camera.
1.4. Using the Axiocam and Zeiss Axiovision Software:
1. Log on to USER account.
2. Doubleclick the Axiovision software icon.
3. Click the workflow toolbar icon to display the following bar along the left side of the computer screen.
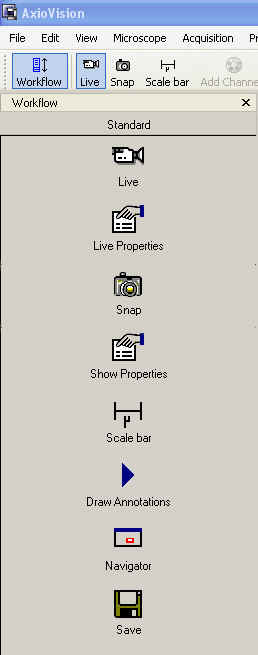
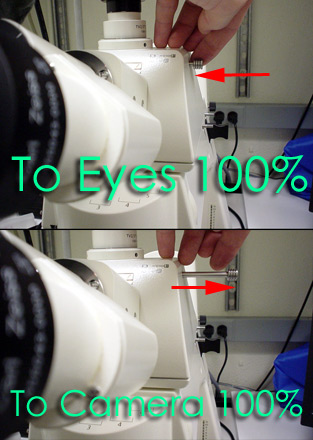
5. Switch beam splitter to camera (100% eyes or camera)
6. The camera preview mode has three settings: Slow, Medium and Fast.
7. The fast will allow a video-rate display with very low resolution, whereas the slow setting offers the best resolution (for focusing etc.) Though the slow setting seems to lag behind the actual movement it is suggested that you use it to do your image focusing with it. To change this mode use the pulldown list located near the video camera icon of the preview window.
*On the bottom of the image window you must configure the objective magnification. It is extremely important to set this for the objective you are using if you plan on using the Zeiss Software to add a scalebar. If you do not do this your scaling information will be wrong and we'll have no way of determining the scale factor later.
8. Click the "Live" button to start the live preview.
10. Click the "Live Properties" button to display the image properties window. This window has multiple tabs for adjusting various settings: The first and second tabs, Display and Adjust are the most commonly used.
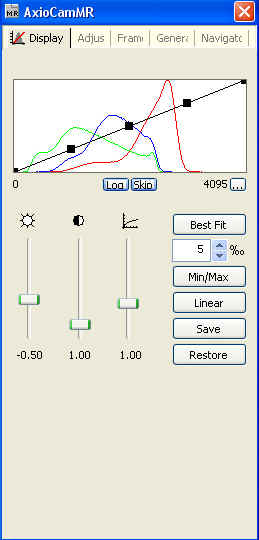
Display tab:
The display tab should show a straight black line above the RGB histograms, if it is curved it will affect the image display. To set the line properly just click the "Linear" button.
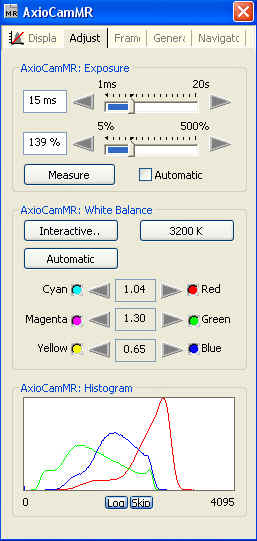
Adjust Tab:
The Adjust window is used for setting exposure times and white balance.
After focusing on the sample it is a good idea to set the exposure time. Click the "Measure" button to do this.
To set the white balance, click "Interactive" and then use the eyedropper tool to select a white region on the image. If no white area is present move the field, select the white area and return to your sample.
Image Acquisition:
Once the exposure time and white balance have been set you only need to focus the specimen and then click the "Snap" button on the left panel.
We suggest that you immediately save the image to your user folder which is located within the C:\user-files\ folder.
Scales may be applied to the image immediately. Note that these will be "burned" into .tif files and cannot be removed.
* Saving and opening files with proper scaling information:
The files saved as .tif or .zvi will contain the scaling information which was configured above. The pixel dimensions are also posted on the AIF website.
To open .zvi files use either the imageJ plugin (doesn't recognize scaling information)
http://rsb.info.nih.gov/ij/plugins/zvi-reader.html
or download the free Zeiss Axiovision LE software available at:
http://www.zeiss.com/c12567be0045acf1/Contents-Frame/cbe917247da02a1cc1256e0000491172
1. Save images (CD, USB key chain, Zip)
2. Log off of computer.
3. Turn off Scope and HG lamp*. (*Only if no other users have signed up to use the scope within the proceeding 2 hours or more.)
4. Turn off camera (switch).
1.7. Using DIC/Nomarski and Polarized Light:
1. Align the Prisms
1. Select the correct filter from the turret.
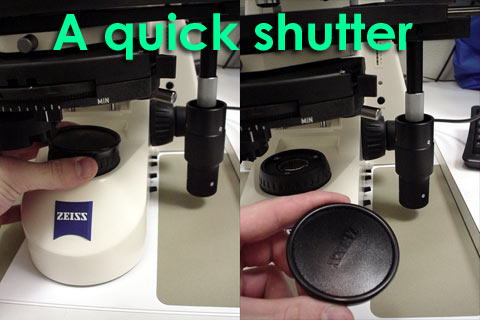
2. Close or turn off the transmitted light, you may use this trick-
3. Open fluorescent light path by moving slider:
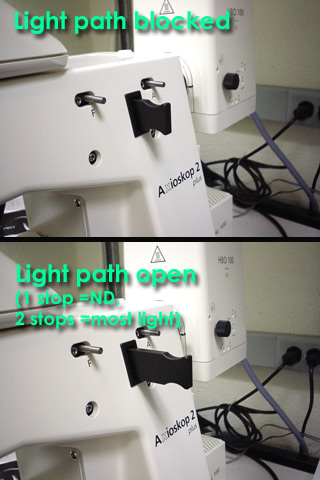
![]()
![]()
Dustin Grzesik 7-14-2005 optimized for IE Any dead links or other comments? Please contact the webmaster.