| |
 Olympus IX70 inverted microscope |
System Specification
|
New As Of July 2007 |
Phase Contrast
- Open the condenser diaphragm all the way.
- Turn the condenser turret to the appropriate setting:
- Ph1 - 10x and 20x objectives
- Ph2 - 40x objective
- Ph3 - 60x objective (green label only)
- Focus your sample
- Align the microscope for Koehler Illumination
Koehler Illumination
- Be sure that the sample is in focus!
- Close the luminous field diaphragm moderately (top lever in light path).
- Focus the diaphragm image by raising and/or lowering the condenser.
- Center the diaphragm image using the two large screws at the front of the condenser.
- Open the luminous field diaphragm until it is at the edge of your field of view.
*Contrast (for brightfield and DIC) can be adjusted using condenser diaphragm. (lever on the left of the Long Working Distance condenser).
**The Koehler Illumination should be checked and adjusted every time you switch objective lenses or if you are imaging live cells, every time you change dishes .Click here for an illustrated version of Koehler Illumination.
Epi-fluorescence
For the simpliest operation, which is one fluorescent probe at a time, both Ludl filter wheels must be set to filter position #1. You then set the filter manually on the microscope.
- Press F1 to open/close fluorescence shutter.
- Press F2 to open/close transmitted shutter.
- Be sure that the Analyzer and the Wollasten prism on the left and right side of the microscope, respectively are out of the light path.
- Turn the filter turret to the appropriate fluorescence filter.
- Focus your sample.
- Position your area of interest in the center of the field.
Two methods for taking pictures are mentioned.
For both methods, start here:
Method 1(Quick Snap):
Method 2 :
Use the 6D acquire or Multimode Acquire commands within IPLab.
Enter the values for:
We may put a microinjection system on this microscope if required.
Return the microscope to it's default settings
After microinjection
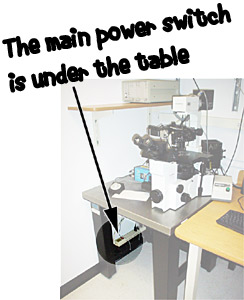
Shutdown