| Digital Station #2 a.k.a.
CCD#2 Clickable table of contents:
|
Overview of system:
| Standard configuration (custom configurations
may be available on request) |
| Olympus IX81 electronically motorized microscope |
60X N.A. 1.4 Phase 3
40X LWD (not for use with coverslipped slides)
20X N.A. 0.4 Phase 1
10X N.A. 0.25 Phase 1
1.6X booster lens on right on microscope should be used with 60X only |
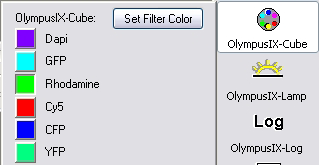
| Fluorescent filters for Dapi,
FITC, Rhodamine, Cy5, YFP, CFP |
| Phase contrast and brightfield |
| Sensicam QE cooled CCD camera |
| IP Lab 4.0.# running on a PC |
| CD burner, USB, Firewire, ALNET for file transfer |
|
Instructions
for Digital Station #2
To Turn System On:
- SIGN INTO LOG BOOK !!
- Turn on mercury lamp (at right on the microscope table). THIS MUST GO
ON FIRST.
- Check if computer is on by wiggling mouse and hitting shift
key. If computer is off, turn on computer with power strip at left and with button
on front.
- Turn on camera, shutters and microscope transmitted light with one
switch on the other power strip on the shelf.
- Log in to the common user account.
- Run IP Lab.
- This will initialize the microscope.
- Choose the folder where your files will go.
- If steps 7 & 8 occurred properly, then you are ready to begin
imaging.
PLEASE CONTINUE READING BEFORE TOUCHING
ANYTHING.
THE MICROSCOPE IS MOSTLY DRIVEN BY ELECTRONICS AND IT IS IMPORTANT THAT YOU CHANGE
OBJECTIVES AND FILTERS FROM COMPUTER KEYBOARD AND MOUSE ONLY.
- To change objective lenses, use the objectives menu. Do not
change objectives by hand.
- Make sure the 1.6X lens slider on the right of the microscope is
pushed in.
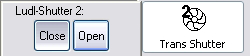
- To turn on/off the transmitted light, use the F2 keystroke or
the Shutter 2 button.
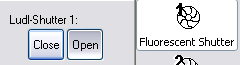
- To turn on/off the fluorescent illumination, use the F1
keystroke or the Shutter 1 button.
- To change fluorescent filters, use the F6, F7 keys or
the clickable menu.
F6 rotates back one position and F7 rotates forwards one position.
- To send light to the camera or back to the eyepieces, use the F4
key or the clickable menu.
- To see your sample live on the computer monitor, use the F3
key.
- To take a picture immediately, use the F9, F10, F11 and
F12 keys. An exposure time can be set for each key by using the <SHIFT>F11
keystroke.
- Also, you may use the Snapshot button in the F3 Acquire
Preview window to take pictures quickly.
- To save all the open pictures, use the File --> Save All
Files... command.
You may save your files in one location only: C:\users
If we find your files stored in other locations, this is an indication that you do not
know how to use the equipment properly and files will be deleted.
- After saving your images, use the Window --> Dispose All
Windows command to clean out the computer screen.
Brightfield transmitted light
microscopy
Check the following settings for Koehler Illumination:
- The condenser setting should be "BF" (The 5
should line up over the dot on the right of the 0.55 NA condenser.)
- Halogen lamp diffusion filter is in place (others out
of light path)
- Filter wheel turret is turned to Dapi setting (position 1)
- To look in brightfield or phase, hit F2 to open transmitted light
shutter.
- Adjust brightness with up/down buttons on front right of microscope
or with software control.
- Place your sample coverslip down on the stage and
focus on your sample using the 10X objective.
- Make sure the condenser iris diaphragm is all the way open (lever on the left of the 0.55NA condenser all the way back)
- Close the luminous field diaphragm moderately (top lever in light
path).
- Focus the diaphragm image by raising and/or lowering the condenser.
- Center the diaphragm image using the two large screws at the front of
the condenser.
- Open the luminous field diaphragm until it is just out of view
- The Kohler illumination should be checked and adjusted every time you
switch objective lenses or, if you are doing work with live cells, when you change
samples.
- Contrast can be adjusted using condenser diaphragm (lever
on the left of the 0.55NA condenser)
Very short and very long working distance condensers are available
for this microscope. Please see the AIF staff if you need one of these other condensers.
Phase Contrast
- Align the microscope as described in brightfield.
- Open the condenser diaphragm all the way (lever
on the left of the 0.55NA condenser)
- Turn the condenser turret to the appropriate setting:
| Ph1 for the 10X and 20X objectives |
| Ph2 for the 40X objective |
| Ph3 for the 60X objective (green
labelling only) |
- There is also a 1.6X "booster" slider on the right side of
microscope. Make sure this lever is pushed in.
SHUTDOWN PROPERLY!
- Long working distance condenser N.A. 0.55 on microscope
- Condenser turret set to BF
- Clean oil off 60X objective with very light application of
lens tissue only. NOT KIMWIPES!
- Exit I.P. Lab software
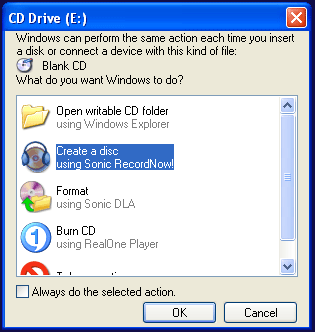
- Transfer all files to Reststop, CD, USB key, etc.
The simplest way to start to CD burner software is to insert a blank disk. This menu
should appear.
- Log out of the computer account
- Turn off the one power strip that turns off camera and shutters
- Leave mercury lamp ON unless evening or weekend AND you are
the last user for a few hours
- Clean up area. Mop up spilled oil. Toss crumpled tissues
in garbage.
- Sign out of logbook
- Remember to take your slides and all your other stuff with you
- Publish the data!
Other Links:
Technical Minutae:
Sample Methods Section:
Images were collected on an Olympus IX 81 (Melville, NY) with
60X N.A. 1.4 planapo optics with a Cooke Sensicam QE air cooled CCD camera.
Images were collected with IPLab 4.0.#.